Spring Security 集成 OAuth 2.0 与 OpenID Connect
介绍 OAuth 2.0 的常见授权模式,以及 Spring Security 作为 OAuth 2.0 Client 和 Resource Server 集成 Keycloak 的配置与实现。
OAuth 2.0 && OpenID
OAuth 2.0 是一个授权框架,客户端通过 Access Token 访问受保护的资源;它本身不负责定义用户认证方式。OpenID Connect(OIDC)在 OAuth 2.0 之上增加了身份认证能力,并通过 ID Token 表达用户身份。Access Token 的格式由授权服务器决定,可以是 JWT,也可以是不透明令牌。
授权模式
授权码模式(authorization code)
1
grant_type=authorization_code
授权码模式(authorization code)是功能最完整、流程最严密的授权模式。
客户端将用户浏览器重定向到授权服务器。用户完成身份认证并同意授权后,授权服务器通过浏览器将 Authorization Code 返回给客户端;客户端再使用该授权码访问授权服务器的 Token Endpoint,以换取 Access Token,最后携带 Access Token 访问资源服务器。
简化模式(implicit)
1
response_type=token
有些 Web 应用是纯前端应用,没有后端,令牌需要由前端持有。RFC 6749 因此定义了直接向前端颁发令牌的方式。这种方式没有授权码这个中间步骤,所以称为“简化模式”(implicit)。
纯前端获取 token , 再用 token 从资源服务器获取数据
注意: Implicit 模式已不再推荐使用,仅应作为旧系统的历史方案了解。现代浏览器应用(包括纯前端 SPA)应使用授权码模式并配合 PKCE,以降低令牌通过浏览器重定向泄露或被重放的风险。
密码模式(resource owner password credentials)
1
grant_type=password
如果你高度信任某个应用,RFC 6749 也允许用户把用户名和密码,直接告诉该应用。该应用就使用你的密码,申请令牌,这种方式称为”密码式”(password)。
帐号密码传递给自身应用, 由自身应用去OAuth 2.0 Server 里获取 token 并存起来, 后续使用这个 token 来访问资源服务器获取数据, 安全性低
客户端模式(client credentials)
1
2
3
grant_type=client_credentials
client_id=CLIENT_ID
client_secret=CLIENT_SECRET
通过上面的三个参数从 OAuth 2.0 Server 里获取 token
Client Credentials 模式用于没有用户参与的机器间调用,客户端使用自己的身份获取 Access Token。它常用于无前端、无法跳转到授权页面的系统,例如后端服务之间的调用、定时任务、命令行程序,以及能够安全保存客户端凭据的 IoT 设备。
Keycloak 支持通过
offline_accessScope 获取 Offline Token,使客户端能够在用户离线或登录会话结束后继续代表用户获取 Access Token。这是 Keycloak 提供的离线访问机制,不是一种 OAuth 2.0 授权模式。
Spring 集成
于 spring 集成时会有两种实现方式(参考)
自身应用作为 client, 使用授权模型获取到 token 后存起来, 适合服务端渲染这类应用. 如果是多实例应用, 还需要用 spring session 进行共享读取 token
后端作为服务器资源, 前端使用简化模式保存 token. 后端服务器资源只校验 token 是否合法
Client 模式
pom.xml 增加依赖
1
2
3
4
<dependency>
  <groupId>org.springframework.boot</groupId>
  <artifactId>spring-boot-starter-oauth2-client</artifactId>
</dependency>
配置 client
1
2
3
4
5
6
7
8
9
10
11
12
13
spring:
  security:
    oauth2:
      client:
        provider:
          keycloak:
            issuer-uri: http://192.168.0.100/realms/demo-realm
        registration:
          keycloak:
            client-id: ${spring.application.name}
            client-secret: ${sec}
            authorization-grant-type: authorization_code
            scope: openid,profile
下面的角色转换代码从 ID Token 的 realm_access.roles 中读取 Realm 角色,因此需要在 Keycloak 管理控制台中开启 Add to ID token:选择对应的 Realm,依次进入 Client scopes → roles → Mappers → realm roles,打开 Add to ID token 并保存。
转换对象
1
2
3
4
5
6
7
8
9
10
11
12
13
14
15
16
17
18
19
20
21
22
23
import org.springframework.core.convert.converter.Converter;
import org.springframework.security.core.GrantedAuthority;
import org.springframework.security.core.authority.SimpleGrantedAuthority;

import java.util.Collection;
import java.util.List;
import java.util.Map;
import java.util.Optional;
import java.util.stream.Stream;

public class AuthoritiesConverter implements Converter<Map<String, Object>, Collection<GrantedAuthority>> {

    @Override
    public Collection<GrantedAuthority> convert(Map<String, Object> claims) {
        var realmAccess = Optional.ofNullable((Map<String, Object>) claims.get("realm_access"));
        var roles = realmAccess.flatMap(map -> Optional.ofNullable((List<String>) map.get("roles")));
        return roles.map(List::stream)
                .orElse(Stream.empty())
                .map(SimpleGrantedAuthority::new)
                .map(GrantedAuthority.class::cast)
                .toList();
    }
}
启动配置
1
2
3
4
5
6
7
8
9
10
11
12
13
14
15
16
17
18
19
20
21
22
23
24
25
26
27
28
29
30
31
32
33
34
35
36
37
38
39
40
41
42
43
44
45
46
47
48
49
50
51
52
53
54
55
56
57
58
59
60
61
62
63
import org.springframework.context.annotation.Bean;
import org.springframework.context.annotation.Configuration;
import org.springframework.security.config.Customizer;
import org.springframework.security.config.annotation.web.builders.HttpSecurity;
import org.springframework.security.config.annotation.web.configuration.EnableWebSecurity;
import org.springframework.security.core.GrantedAuthority;
import org.springframework.security.core.authority.SimpleGrantedAuthority;
import org.springframework.security.core.authority.mapping.GrantedAuthoritiesMapper;
import org.springframework.security.oauth2.client.oidc.web.logout.OidcClientInitiatedLogoutSuccessHandler;
import org.springframework.security.oauth2.client.registration.ClientRegistrationRepository;
import org.springframework.security.oauth2.core.oidc.OidcIdToken;
import org.springframework.security.oauth2.core.oidc.user.OidcUserAuthority;
import org.springframework.security.web.SecurityFilterChain;

import java.util.List;
import java.util.Map;
import java.util.Optional;
import java.util.stream.Collectors;
import java.util.stream.Stream;

@Configuration
@EnableWebSecurity
public class SecurityConfig {

    @Bean
    AuthoritiesConverter realmRolesAuthoritiesConverter() {
        return new AuthoritiesConverter();
    }

    //Keycloak Realm 角色映射到Spring Security上
    @Bean
    GrantedAuthoritiesMapper authenticationConverter(AuthoritiesConverter realmRolesAuthoritiesConverter) {
        return (authorities) -> authorities.stream()
                .filter(authority -> authority instanceof OidcUserAuthority)
                .map(OidcUserAuthority.class::cast)
                .map(OidcUserAuthority::getIdToken)
                .map(OidcIdToken::getClaims)
                .map(realmRolesAuthoritiesConverter::convert)
                .flatMap(roles -> roles.stream())
                .collect(Collectors.toSet());
    }

    @Bean
    SecurityFilterChain clientSecurityFilterChain(
            HttpSecurity http,
            ClientRegistrationRepository clientRegistrationRepository) throws Exception {
        http.oauth2Login(Customizer.withDefaults())
                .logout((logout) -> {
                    var logoutSuccessHandler =
                            new OidcClientInitiatedLogoutSuccessHandler(clientRegistrationRepository);
                    # 如果使用keycloak, 这地址要跟keycloak里配置的完全一样
                    logoutSuccessHandler.setPostLogoutRedirectUri("{baseUrl}");
                    logout.logoutSuccessHandler(logoutSuccessHandler);
                })
                .authorizeHttpRequests(requests -> {
                    requests.requestMatchers("/", "/favicon.ico").permitAll();
                    requests.requestMatchers("/nice").hasAuthority("role_user");
                    requests.anyRequest().denyAll();
                });

        return http.build();
    }
}
controller 获取登录用户
1
2
3
4
5
6
7
8
9
10
11
12
13
14
15
16
17
18
19
20
21
22
@GetMapping("/")
@ResponseBody
public  Map<String, Object>  getIndex(Authentication auth) {
Map<String, Object> rest = new HashMap<>();
rest.put("name",
         auth instanceof OAuth2AuthenticationToken oauth && oauth.getPrincipal() instanceof OidcUser oidc
         ? oidc.getPreferredUsername()
         : "");
rest.put("isAuthenticated",
         auth != null && auth.isAuthenticated());
rest.put("isNiceRole",
         auth != null && auth.getAuthorities().stream().anyMatch(authority -> {
             return Objects.equals("role_user", authority.getAuthority());
         }));
return rest;
}

@GetMapping("/nice")
@ResponseBody
public Object getNice(@AuthenticationPrincipal OidcUser principal) {
    return principal.getPreferredUsername();
}
(可选) 自定义 @AuthenticationPrincipal 的对象, 原理是代理了一下OidcUser
1
2
3
4
5
6
7
8
9
10
11
12
13
14
15
16
17
18
19
20
21
22
23
24
25
26
27
28
29
30
31
32
33
34
35
36
37
38
39
40
41
42
43
44
45
46
47
48
49
50
#定义用户
import org.springframework.security.core.GrantedAuthority;
import org.springframework.security.oauth2.core.oidc.OidcIdToken;
import org.springframework.security.oauth2.core.oidc.OidcUserInfo;
import org.springframework.security.oauth2.core.oidc.user.OidcUser;

import java.util.Collection;
import java.util.Map;

public class CustomUser implements OidcUser {

    private String id;
    private Long employeeId;
    private OidcUser delegate;

    public CustomUser(String id, OidcUser delegate) {
        this.id = id;
        this.employeeId = (Long) delegate.getAttributes().get("employeeId");
        this.delegate = delegate;
    }


    public String getId() {
        return id;
    }

    @Override public Map<String, Object> getClaims()              { return delegate.getClaims(); }
    @Override public OidcUserInfo getUserInfo()                   { return delegate.getUserInfo(); }
    @Override public OidcIdToken getIdToken()                     { return delegate.getIdToken(); }
    @Override public Map<String, Object> getAttributes()          { return delegate.getAttributes(); }
    @Override public Collection<? extends GrantedAuthority> getAuthorities() { return delegate.getAuthorities(); }
    @Override public String getName()                             { return id; }
}

# 自动装配
@Bean
OAuth2UserService<OidcUserRequest, OidcUser> customOidcUserService() {
    var delegate = new OidcUserService();
    return req -> {
        OidcUser oidc = delegate.loadUser(req);
        return new CustomUser(oidc.getPreferredUsername(), oidc);
    };
}

#使用
@GetMapping("/nice")
@ResponseBody
public Object getNice(@AuthenticationPrincipal CustomUser principal) {
    return principal.getId();
}
Resource Server 模式
acccess token 验证方式
JWT Decoder: resources server 自己使用公钥来验证签名
内省(Introspection): 将访问令牌发送给授权服务器,由其验证令牌的有效性并返回令牌的详细信息
Keycloak 的 access tokens 是 JWT
JWT Decoder 模式
准换类型复用上面的 AuthoritiesConverter
增加依赖
1
2
3
4
<dependency>
    <groupId>org.springframework.boot</groupId>
    <artifactId>spring-boot-starter-oauth2-resource-server</artifactId>
</dependency>
配置文件
1
2
3
4
5
6
spring:
  security:
    oauth2:
      resourceserver:
        jwt:
          issuer-uri: http://192.168.0.100/realms/demo-realm
启用配置
1
2
3
4
5
6
7
8
9
10
11
12
13
14
15
16
17
18
19
20
21
22
23
24
25
26
27
28
29
30
31
32
33
34
35
36
37
38
39
40
41
42
43
44
45
46
47
48
49
50
51
52
53
import org.springframework.context.annotation.Bean;
import org.springframework.context.annotation.Configuration;
import org.springframework.core.convert.converter.Converter;
import org.springframework.security.authentication.AbstractAuthenticationToken;
import org.springframework.security.config.annotation.web.builders.HttpSecurity;
import org.springframework.security.config.annotation.web.configuration.EnableWebSecurity;
import org.springframework.security.config.http.SessionCreationPolicy;
import org.springframework.security.oauth2.jwt.Jwt;
import org.springframework.security.oauth2.server.resource.authentication.JwtAuthenticationConverter;
import org.springframework.security.web.SecurityFilterChain;

@Configuration
@EnableWebSecurity
public class SecurityConfig {

    @Bean
    public AuthoritiesConverter authoritiesConverter() {
        return new AuthoritiesConverter();
    }

    @Bean
    JwtAuthenticationConverter authenticationConverter(AuthoritiesConverter authoritiesConverter) {
        var authenticationConverter = new JwtAuthenticationConverter();
        authenticationConverter.setJwtGrantedAuthoritiesConverter(jwt -> {
            return authoritiesConverter.convert(jwt.getClaims());
        });
        return authenticationConverter;
    }

    @Bean
    SecurityFilterChain resourceServerSecurityFilterChain(
            HttpSecurity http,
            Converter<Jwt, AbstractAuthenticationToken> authenticationConverter) throws Exception {
        http.oauth2ResourceServer(resourceServer -> {
            resourceServer.jwt(jwtDecoder -> {
                jwtDecoder.jwtAuthenticationConverter(authenticationConverter);
            });
        });

        http.sessionManagement(sessions -> {
            sessions.sessionCreationPolicy(SessionCreationPolicy.STATELESS);
        }).csrf(csrf -> {
            csrf.disable();
        });

        http.authorizeHttpRequests(requests -> {
            requests.requestMatchers("/me").authenticated();
            requests.anyRequest().denyAll();
        });

        return http.build();
    }
}
获取登录用户
1
2
3
4
5
6
@GetMapping("/me")
public UserInfoDto getGetting(JwtAuthenticationToken auth) {
    return new UserInfoDto(
            auth.getToken().getClaimAsString(StandardClaimNames.PREFERRED_USERNAME),
            auth.getAuthorities().stream().map(GrantedAuthority::getAuthority).toList());
}
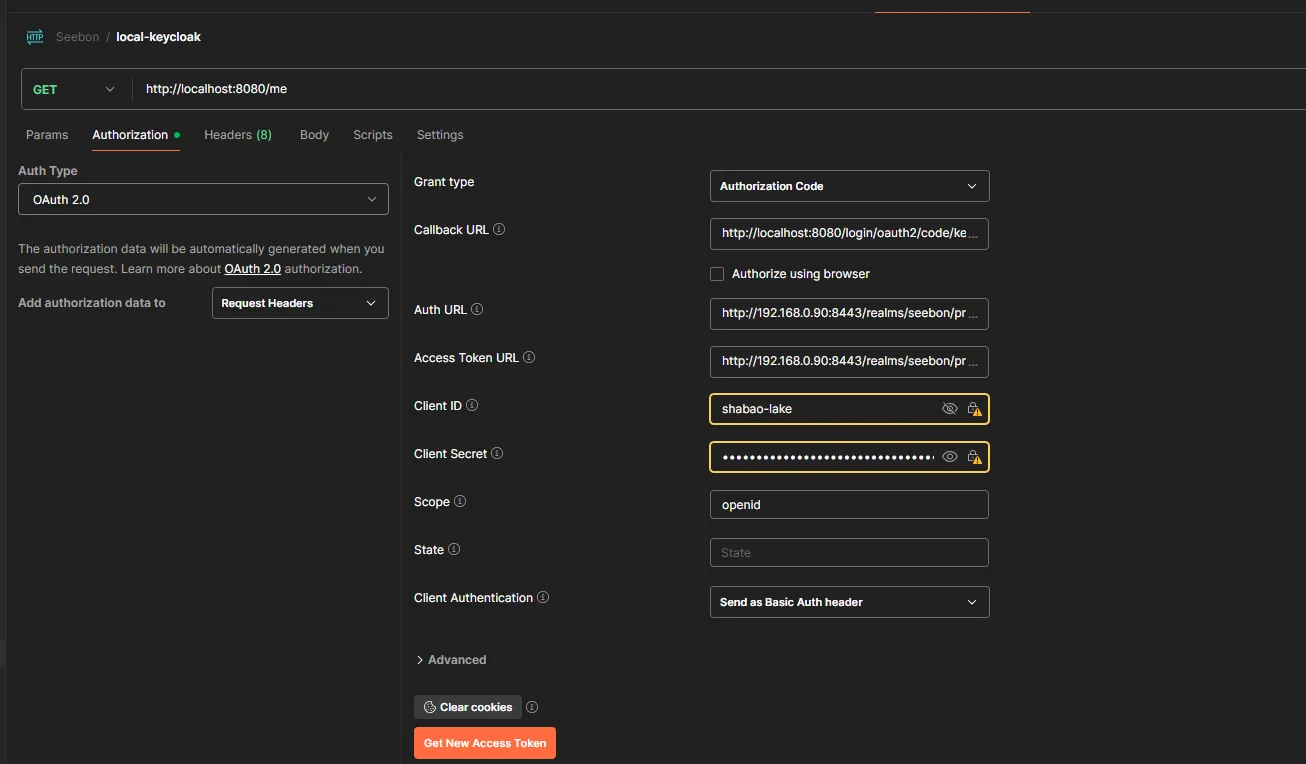
在 postman 如下配置后点 Get New Access Token 获取 token 之后就可以调用接口
Callback URL: http://localhost:8080/login/oauth2/code/keycloak
Auth URL: http://192.168.0.100/realms/demo-realm/protocol/openid-connect/auth
Access Token URL: http://192.168.0.100/realms/demo-realm/protocol/openid-connect/token
Client ID: 对应的应用 id
Client Secret: 对应应用的Secret
Scope: openid
附加知识:验证 Access Token 的 Audience
当同一个 Realm 为多个 Resource Server 签发 Access Token 时,可以使用 aud(Audience)限定 Token 允许访问的目标服务。下面以 web-client 调用 order-api 为例。
首先在 Keycloak 管理控制台进入 Client scopes → Create client scope,创建 Client Scope:
1
2
Name: order-api-audience
Type: Default
也可以选择 Optional,区别在于该 Client Scope 是否默认应用到 Token。
然后进入 Client scopes → order-api-audience → Mappers → Add mapper,选择 Audience,并配置:
1
2
3
Name: order-api-audience
Included Custom Audience: order-api
Add to access token: On
最后进入 Clients → web-client → Client scopes,将 order-api-audience 添加到 Assigned Default Client Scopes。如果只希望在请求时指定,则添加到 Assigned Optional Client Scopes,并在授权请求中包含:
1
scope=openid profile order-api-audience
重新获取 Access Token 后,其 aud 应包含:
1
2
3
{
  "aud": ["order-api"]
}
Resource Server 可以增加 Audience 验证:
1
2
3
4
5
6
7
spring:
  security:
    oauth2:
      resourceserver:
        jwt:
          issuer-uri: http://192.168.0.100/realms/demo-realm
          audiences: order-api
其中,order-api-audience 是 Client Scope 名称,order-api 是写入 Access Token 的 aud 值,两者含义不同。